Sunday, June 16, 2013
Just Moved
This blog has moved to http://overlordsofthedesert.com/blog-2/ and the cardboard creativity continues.
Friday, April 19, 2013
Free Paper Action Warriors! Yeah, Get Some!
Lots of changes in my life these past two weeks. My first child was born and now I started my own website. You can now follow my cardboard art projects at http://overlordsofthedesert.com/
But wait. There's more.
Hold on to your keyboard baby because this one's a screamer!!!
The Overlords of the Desert have arrived!

But wait. There's more.
Hold on to your keyboard baby because this one's a screamer!!!
The Overlords of the Desert have arrived!

Visit http://overlordsofthedesert.com/ for a different take on paper dolls. Get ready for paper action warriors!
Friday, April 5, 2013
What Are You Staring At?
It's almost baby time! I am going to have to take a break from my current project for a few days because it may be time for my first baby to arrive. Woo hoo! In the meantime, I will leave you in the capable hands of Mr. Red Head McWhite Horns. He is an older project I finished a year ago and he has been dying for some attention.


Thursday, April 4, 2013


Tuesday, April 2, 2013
Forearms? Yes Please.
Big day today. Met with a pediatrics doctor, rubbed my pregnant wife's feet, and managed to complete some forearms. Oh yeah, life is good. Things are moving along nicely and I predict some hands and fingers in the near future. That's right, those toilet paper rolls so nicely stacked in a proficient military manner will soon forge themselves into bad mother crushers. What's that? You don't understand the bad mother crusher reference? Well then you better go watch the edited for television version of Robocop to find out.


Below are some intense drying shots for your viewing pleasure.


Dry baby! Dry!
Monday, April 1, 2013
Biceps And Triceps...Oh My!
Another day, another body part. The little tubes at the end of his biceps will act as his elbow joints. Who knew toilet paper rolls had so many functions??? I know, I know...teachers do, that's who!


Friday, March 29, 2013
Cardboard Shoulder Joints
Alright, looks like the little guy grew a nice, broad, pair of shoulders. This is what happens when you eat your vegetables and pump some iron. Just in case you are curious, below is the process on how I make shoulder joints for my cardboard characters.

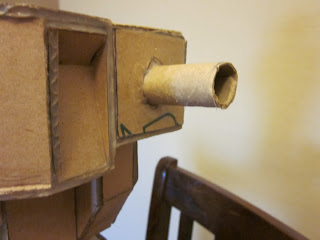


Step 1: Put some glue on a toilet paper roll, roll it up tight, and let it dry. Once dried, anchor it to a cardboard base and glue it in tight.

Step 2: Cut a hole into a piece of cardboard that you plan on using as the moving part. This piece will be the foundation of the rotating shoulder. The hole should fit very snug around the toilet paper roll. In addition, I like to put a light layer of tacky glue around the hole to make it more durable. This prevents the cardboard from tearing.

Step 3: Place the moving piece onto the toilet paper roll after the glue is dried. Don't worry if the piece fits tight. The snugger it is, the better.

Step 4: Cut any excess from the toilet paper roll. You just want a little bit of it sticking out.

Step 5: Use some scissors and cut four slits into the toilet paper roll. Then fold them back against the moving part.

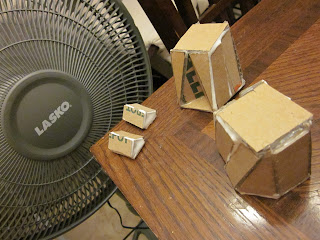
Step 6: Cut out a small piece of cardboard and glue it against the flaps you cut. Make sure you only have glue on the flaps and not on the moving piece. Put pressure against the flaps for about 45 seconds so everything is nice and smashed together. Then let it dry for a few minutes. Super Secret Tip: Having a fan blowing on high is a great tool for helping tacky glue dry. The fan will dry the exposed layer of glue and let you move on without worrying about unwanted dripping.

Step 7: Now it's time to cut out the "walls" of your shoulder and glue them to your moving part.

Step 8: Once the "walls" have dried, glue on the shoulders "roof". You should basically have a complete shoulder now.

Step 9: Fill in the rest of the shoulder, if necessary, and make sure all your edges are filled in with tacky glue.
Super Secret Tip: Filling in the edges of cardboard with tacky glue reinforces the piece and makes it very durable. This process takes time but the results are very rewarding. You will be surprised just how solid a cardboard figure can become.

Step 10: Let the new shoulder joint dry overnight and you have yourself a rotating joint. Now it's time to add the rest of your arm. This is one of my favorite ways of making a movable joint but their are tons of other ways to accomplish the same goal. I recommend you experiment with your own ideas and see what technique you like using the best.

In conclusion, I wanted to share with you my tacky glue of choice. Aleene's has never done me wrong and it is a great tool to have when working with cardboard. I highly recommend it if you don't have a brand you already trust.
Subscribe to:
Posts (Atom)